Friday 27 December 2013

Merry Xmas!

Merry Xmas and so on..

Long time and no posts. I've actually not been up to anything in this project lately due to winter times and less hobby time.

However, Christmas has yielded some donations for my quad project. I've therefore decided to take it one step further. I've previously written about FPV and how I'd like to set it up. Until today, I've only been looking but the time has come to put down the order. These is the items I bought..

http://www.banggood.com/808-NO_16-HD-120-Degree-Mini-Camera-Module-7g-p-82197.html?p=XQ021315561820130448
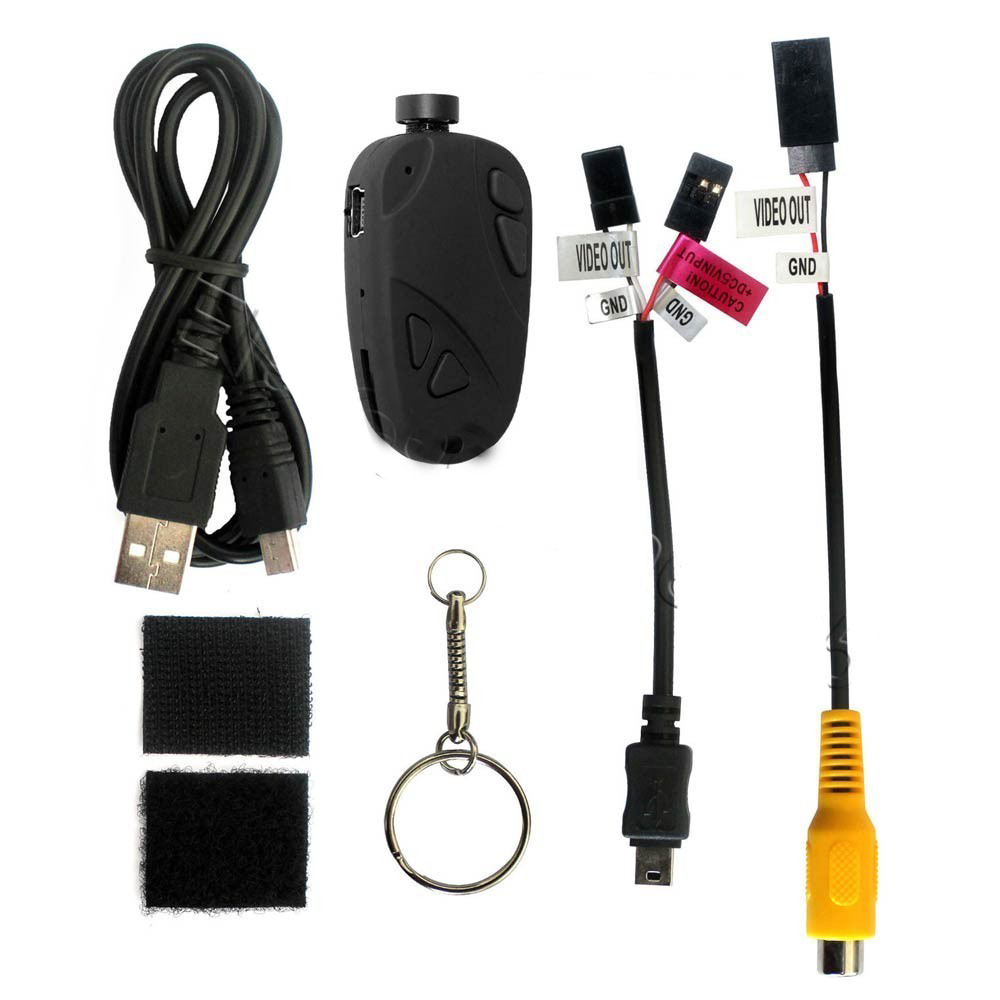
First of all, we need a suitable camera to record images. This is the 808 #16 key chain camera is similar to the other original 808 key chain camera I bought this summer apart from a 120 degree wide angle lens and video output capabilities. Having 120 degree instead of 76 degree lens helps a lot when trying to navigate using a small screen or goggles.
http://www.banggood.com/FPV-1_2G-8CH-800mw-Wireless-AV-Transmitter-And-Receiver-p-73201.html?p=XQ021315561820130448
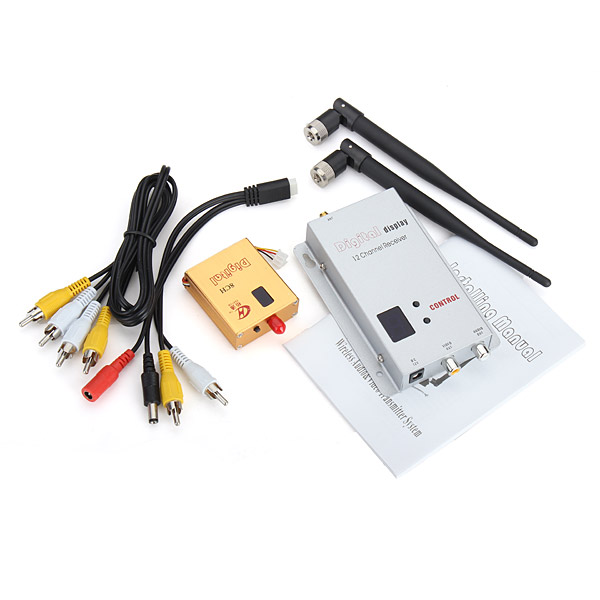
Next you need a way to transmit the images you've captured. I've decided to use a 1.2GHz transmitter instead of the regular 5.8GHz that most people use. The reason for using a lower frequency is to gain a longer wave length. For you who are not familiar with the result of this wave length difference, it basically will allow the radio waves to bypass larger objects. With a 5.8GHz radio you need pretty much nothing in between transmitter and receiver. However with 1.2GHz, trees and stuff may come in the way. Even larger objects probably allow the waves to reach its destination.
http://www.banggood.com/FPV-7-Inch-TFT-LCD-Monitor-HD-800x480-Screen-With-Audio-For-RC-Models-p-91664.html?p=XQ021315561820130448
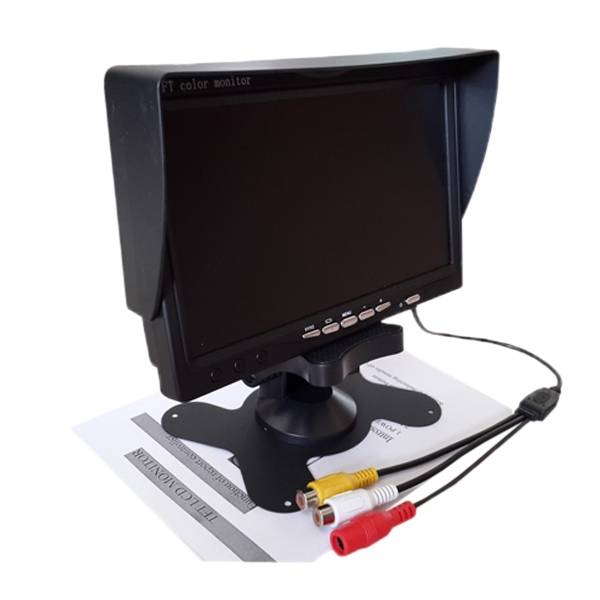
To display the result of the capture, I've gone with this 7 inch monitor. It requires 12V DC, which as to be solved in one way or another to make the experience mobile. Here I have a secret plan that some day may be turned into reality but will so far stay my secret :).
http://www.banggood.com/Wholesale-Easycap-USB-2_0-Video-TV-DVD-VHS-Audio-Capture-Adapter-p-2758.html?p=XQ021315561820130448
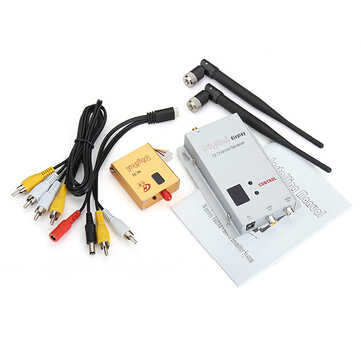
Next item is something I came across just by browsing banggood.com and is a composite video receiver for a computer. This will allow received images to be projected on my laptop screen instead of an external monitor. This is also a part of my secret plan.


Now for the bad news, what do I need to pay for these items?
FPV 1.2G 8CH 800mw Wireless AV Transmitter And Receiver $55.99
Easycap USB 2.0 Video TV DVD VHS Audio Capture Adapter $7.00
FPV 7 Inch TFT LCD Monitor HD 800x480 Screen With Audio $52.99
808 NO.16 V2 HD 120 Degree Mini Camera Module 7g $43.99

Total US$160

Friday 20 September 2013

A new era, a new beginning

It's been a while since my last post. The main cause is that I felt the energy drain as the fall gets more visible with worse weather, not too encouraging for quad flights. The darkness is also upon us, which makes flight difficult if it's not during day time.

As I've previously written, I ordered the radio telemetry, which I now got working. No hassle, it worked instantly. The only fault I did was to not turn down the COM-port speed from 115k to 57k, there after it worked as a charm :). The picture displays how the flight controller is connected to the laptop and Mission Planner using the radios. The radios are basically a wireless serial port.

Next, I focused on the darkness or rather how to fly when it's not full day light. Dusk has previously also been a hassle but these lights should mitigate that obstacle. Looking close at the picture below you can see how I wired the break out wire directly to the power distribution board. The board has tiny connectors all over, which allows soldering and therefore can provide extra connectivity as these lights require 11V.

Now to the final product, I started putting the quad back together, putting the lights in place. Hope this can light up any future winter flights.

I decided to go with green on the front and red on the back. Traditionally you should have green to the left and red to the right, but that doesn't help me when I usually see the quad from behind. Therefore I went with red to back and green up front.
 

Thursday 29 August 2013

Current and voltage meter in the mail today!

This is what I got in the mail today. I ordered it from GoodLuckBuy and it was shipped out 10 days ago. This still means that the average time to delivery from China is about 9-10 days depending on holidays I suppose.

The little device in the middle gets hooked up and man-in-the-middles the power coming from the battery and tells the flight controller how much juice it has left. There is an excellent integration instruction at ArduCopters wiki but this is roughly how its meant to work shown in the picture to the right. There are some settings in Mission Planner that allows the flight controller to conduct an emergency landing if the voltage falls too low. Remember that I previously written that I've set my ESC's to cut power at 3V in order to spare the batterys health. This means that I should make an emergency landing prior to that. Other than an emergency landing is also to order the flight controller to RTL. However, we all know how that ended last time..
Talking about failing RTL's, I yesterday think I've got a clue why the GPS has been acting strange lately. By accident, I looked at the quad's heading according to the flight controller and it was 90 degrees wrong. This means that I've mounted the GPS 90 degrees wrong which makes the flight controller do things the wrong way.

Another update is that I received an e-mail this morning from the author of MegaPirateNG with a link to MPNG-3.0.1-R2 :). I still haven't downloaded the code but I sure will within the next few days.

I've also got another package in the mail about a week ago, which I still haven't written about. I will do so in a separate blog post due to its large content. I also have a few surprise upgrades so stay tuned ;)


Tuesday 27 August 2013

MegaPirateNG 3.0.1 is out!

Sounds like a shout from the grave but this is something that I didn't expect.
Today I read on some forum that MegaPirateNG 3.0.1 is out. It also has a brand new official site. The site claims that they have shipped the new code to those who have donated at least $10 to the project. The rest of the world has to wait until late September. Therefore, today, I've donated $10 and should hopefully receive an e-mail containing a golden link. I did that also because I want to support the continuation of MPNG.

As soon as I get the link, I'll make sure to try it out and report back on the look and feel.

Link to MPNG official site: http://www.megapirateng.com

Thursday 15 August 2013

Radio telemetry ordered

A few days ago, I decided that it was time to order a radio telemetry set. I went for the set from GoodLuckBuy.com (got to love that name) for roughly $36. However, today when I investigated into why I hadn't received any package tracking information, I discovered that the package hadn't event been shipped out. Slightly disappointing as the page does not clam that the items are out of stock. The support chat however informed me that the items were in fact out of stock. Big minus for that site.


Anyhow. Not loosing fate, I decided to order yet another item, which I found in the new arrivals at DealExtreme as well but for a higher price. This is a current and voltage sensor that is way cheaper than shiny once at Sparkfun.com. It looks the same and has the same specifications but for a lower price, $14. It's used to report how much juice is left in the battery back to the MultiWii flight controller, which may take action if the capacity is going low. Actions such as RTL or land. We'll see how this goes but the support attendee informed me that the item was in fact in stock. At least one item was..

Saturday 10 August 2013

MegapirateNG vs. MultiWii

I've been reading up on forums on the progress of future releases for the MegaPirateNG code base. To my astonishment I soon found out that the main maintainer behind MegaPirateNG left the project to join the ArduPilot team. This means that currently MegaPirateNG isn't developed. A small project fork all tho seem to have been done by some enthusiasts. This is called megapirateng-add-ons ( https://code.google.com/p/megapirateng-add-ons/ ) and is a beta into MegaPirateNG 2.9.1. Some folks claim its superb while some clam it has serious bugs. Others tell to look into the MultiWii code base instead.

Today I tried out the MultiWii 2.2 code, which is the latest in it's branch. From the first look and feel, it feels like the quad is handling a lot more stable. This is before touching any PID parameter configurations. I've done some level flights and it feels really stable. I haven't figured out if it's possible to configure the controller to decelerate the quad on releasing any of the pitch or roll controls, which MegaPirate did by default. That behavior is very helpful for beginners.

The guide I used to get going with MultiWii can be obtained from this forum thread:
http://www.multi-rotor.co.uk/index.php?topic=411.0

This is my current configuration and a look at the MultiWii configuration program.
One detail I found very useful is the fully configurable mode selector. This can be used to combine several features to build your own flight modes instead of having to use any vendor supplied modes.
My configuration states that not using AUX1 should result in a level (angle) flight. Using AUX1, level, barometer to hold altitude, magnetometer to hold heading and GPS to hold position should be used. AUX3 is used in a similar fashion but invoking GPS return to home instead.

It's thereby possible to combine any of these features in any desired way. Further explanation can be obtained at the MultiWii wiki page.

Stay tuned for more information as I go along. I will try to test out the GPS return to home function rather soon.

Friday 9 August 2013

Another one bites the dust

There has been a few days since I last wrote. To that, I can only say: laptop + morning coffee = less blogging and even less field testing of quad.

Today was however the first time since the resurrection that I've done some serious testing. I wanted to try out the RTL (return to launch) function that went AWOL last time I tried.
The first thing that happened today once I fired up the quad and was lifting off was that after 30 meters or so, one of the blades of the front left propeller broke off. I didn't realize this at first but what happened was that I heard a ill sounding noise as if something broke followed by a ill sounding motor engine. The quad then slowly started banking towards left and at that point, I couldn't stop it from flying further to the left. I made a controlled crash landing as I couldn't stabilize the quad. Once I located it again I quickly realized why it behaved as it did; it had close to no lifting power on the left side and therefore, I couldn't stop the motion towards left.

This is one of the 8x45 propellers I recently bought and from the breaking point it looks like it might had been delivered with a defect. I am no expert in this field but you can examine the picture for your self. Anyhow, these are cheap propellers and I guess I buy more as they may break. The positive outcome from this accident is that I now know that a failing propeller isn't an instant fatal crash but very recoverable.

I've considered buying these carbon fiber propellers instead of the plastic propellers I've been using until now but they are fairly pricy and I think I need more practice and less close calls to fund these. Carbon fiber propellers won't take any small nudges without splintering into pieces nor will the plastic once but the plastic once are six times cheaper..

Sunday 4 August 2013

X550 resurrected

Done a few test flights with the X550 after replacing broken parts and it seem to fly as it should. Haven't tried anything GPS related yet but it spins like a cat and flies like a bird.

This is a short video from one of the first trial flights. The camera vibrates like crazy but you can still make something out after using the stabilizing enhancements thanks to YouTube. Guess I'll need to do something about this in the future.

Saturday 3 August 2013

RIP zippy

The last casualty of the crash is the battery. I tried all last night to revive it using all sorts of Jedi mind tricks to the charger according to instructions. The force wasn't with me this time and as I feared it felt it might catch fire due to the heat and the fact that it started expanding, I stopped my attempts. This must be the single most expensive loss of this crash but still nothing compared to rebuilding the whole quad.

Friday 2 August 2013

Whats broken

Today's casualties:
  • Bottom right boom was bent
  • Propellers spent as you can see
  • One motor with strange sounds
  • Ultrasonic range finder is MIA
  • Few nuts and buts are spent
I found all electronics including flight controller, GPS, radio and ESC's to seem to work as usual.

Next thing I'll buy is the telemetry radio :).

The X550 has returned!

Today I found the phone with the number set up for people whom might have found my quad with a new message :). A local farmer had found it in the woods to the west of the high way where I was flying eastwards of. In other words, it flew over 300 meters away from where I have been looking for it.
I still haven't had the time to assess any damages but from what I can see, the frame is slightly bent in a couple of places and propellers are broken. Other than that will be in my next post.  

Shoestring FPV kit

Something I haven't written about yet is FPV on a shoestring budget. The main reason why I haven't is that I can't currently afford it. However, here is a suggestion that definitely goes on my wishlist for Christmas.

First item on the board is a camera. I've previously written about the key chain 808 DVR for less than $7 that does OK recording. But for FPV you need something else. Now there is a version 2 of the 808 key chain camera that can do just that. The kit also includes a USB to video out cable that can be attached to any video transmitter to enable FPV. The improved camera is fitted with a 120 degree wide angle lens instead of the crappy narrow angle lens on the cheaper 808. This camera goes for $39 at eletoponline365's eBay shop.


For transmitter, I'd choose something with a low frequency again as with the controller radio. That is to gain as long range as possible. I found this kit at Banggood featuring a 1.2GHz transmitter. Other FPV kits regularly feature 5.8GHz. The problem with 5.8GHz is that you need clear sight between the transmitter and receiver. With a 1.2GHz it can work with some obstacles. This transmitter and receiver kit goes for $56 at Banggood.


A OSD device is something some people prefer as it applies a virtual head up display on the FPV image. The OSD device is hooked between the camera and radio transmitter hijacking the image and applying OSD using data from the flight controller. An OSD usually applies information such as: virtual horizon, altitude, air speed, heading, direction and range to "home". Home as applied for RTL. This OSD goes for $27 at Banggood.

You probably need additional wiring to connect the kit together but these are the basic devices needed for FPV.

Summarizing purcuses:
  • $39 - 808 #16 v2 key chain camera
  • $56 - FPV radio
  • $27 - OSD device
In total, $122.

Thursday 1 August 2013

More electronics

Doing some further research found that HobbyKing also features the 433MHz telemetry kit I found at GLB (GoodLuckBuy.com). Link to mentioned kit.

However, this kit comes with antennas that are optimized for 900MHz rather than 433MHz according to comments. Seem to be the same transmitter and receiver anyhow so if I choose to buy these, it will be from GLB.

Further browsing, I found a flight controller resembling the MultiWii/MegaPirate controller I previously used. This controller claims to be version 3 and seem to have improvements in the way the serial ports are made. Version 2 had three serial ports in the same physical port when this controller has separate physical ports for each serial port. I can't see any other differences looking at chip specifications.
MultiWii & MegaPirate v2.0
MWC Mega 3.0


If I can find that these are compatible, I'd rather choose the version 3 as soldering small wires are a pain when breaking out the serial ports.

Wednesday 31 July 2013

Still missing.. and continuation

Yesterday I was out with a few relatives again to try and find the X550. No luck but must my posters are still hanging on the trees. My strongest guess is still that it's stuck in one of the trees at 15+ meters. However, due to the thick leafs it's quite hard to see anything. I'll have to wait for the leafs to fall off this fall and have a return trip to see if it's possible to spot it.

In the meanwhile if I get no word from any by-passers in a few weeks and as I still have a lot of parts and utilities, I think I'm going to start building a new quad. Almost half of what I've so far invested into this hobby are things such as battery chargers, spare parts, spare propellers and so on. This means I can probably put one together with not too much money.

What I'm missing are electronics and motors, which at most add up to a little more than $150. What I will further invest into and which would have saved my X550 that's done MIA is a radio linked telemetry system. It would have broadcasted it's position and I'd been able to find it easy. Now there are a few ways of solving the telemetry.

3DR $86
One way is the all expensive 3DR Radio Telemetry Kit seen to the right. It costs $86 and would probably do it's job in excellence. But as I'm still aiming for a shoestring budget, I'm sure there are alternatives.

Below are two low cost alternatives. They cost less than half of the original 3DR but should do the job. I've read a blog post regarding the APC220 about how to connect it properly. The third option I found yesterday browsing the web. I have no idea if it works but its branded as the 3DR with a different price so I guess it's a copy. But might still work as well as as the original.

3DR copy(?) $36
APC220 $33


Saturday 27 July 2013

In short, the X550 is still MIA

As the topic says, my X550 is still MIA. The day before today, I went to a library and produced these posters and have put a bunch of them up on trees in the area where it disappeared. Today I also filed a report to the local police department regarding my loss hoping that if someone turns it in, the report will be recognized. My hopes now stay with possible by-passers that happens to spot my quad and hopefully makes a phone call. 

And no, it's not my real phone number. It's juts prepaid number I acquired for the poster that I'll terminate once it's no longer required.

Stay tuned! All hopes aren't gone yet.

Thursday 25 July 2013

RTL fly away...

Yesterday I went away to find a field large enough to do some serious RTL (return to launch) and navigation testing. This requires space without trees too close. I found some nice fields and started testing. I successfully tested both RTL and three way point navigation before my last RTL went sour...

I flew quite far away as I previously had done and hit the RTL. The normal procedure then is for the quad to gain height to 15 meters, which is default. Then head to its home position and descend to about 3 meters and loiter. This time, instead of turning towards home, it started drifting to the left. I quickly intervened to save the quad by counter steering rightwards. The quad then rotated 90-180 degrees making the direction impossible to see from this distance and disappeared behind those trees according to the drawing. I then ran towards the highway and never saw it again.


I've since then been covering the grounds around the point where it disappeared for about 8 hours in total, checking trees and the ground where it might have crashed without result.

It might have kept going in that direction ending up on the other side of the field as the program does not include anything about landing, but keeping 15 meters until the destination has been reached. It might also have taken a short trip on the field, then turned around ending up somewhere else. I still think the highest possibility is that it sitting in one of those trees along the highway.

Later today or tomorrow, I'm going to print posters asking people to contact me if they find my quad. Hope that gives some results. At this point, I don't think I can afford a new one, which leaves me with a pile of spare parts that will not be used..

Wednesday 24 July 2013

The new propellers was a success

Last night I tried out the new 8 inch propellers along with a fresh motor to replace the last faulty one. The x550 now spins like a cat and flies like a bird. I trimmed the flight controller for the new propellers, which wasn't all that much to change and it's very stable.

After the basic trimming I started working on navigation and RTL (return to launch). These also has a set of P, I and D parameters for navigation. There is a good guide over at the ArduCopter wiki. However, I didn't have much success in trimming the RTL and the x550 always overshot or navigated wrong. Once both batteries were drained, I figured out that I'd trimmed using wrong parameters, dooh! I had been trimming the HLD_LAT/LON instead of LOITER_LAT/LON. Will have to do this at some other point where I can find a good field to try it out at.

Link to the guide: https://code.google.com/p/arducopter/wiki/AC2_loiter_PID

Tuesday 23 July 2013

Packages packages, more packages and washers

This came in the mail today. It's the order for new motors and 8 inch propellers. Having smaller propellers also eases the torch on the motors, which should lessen the overheat.

Now I might have come to a conclusion why my motors are failing. Due to the nature of aluminum, its quite weak. Now as the screws that hold the motor in place slightly bends the aluminum inwards, the top of the screw seem to get scewed too far into the motor and may cause a short circuit.

To counter this condition, I've bought some washers. These washers are used both to protect the aluminum from bending too far and also to put some distance between the top of the screw to the motor. I also bought some locking washers to keep the screws in place keeping them from coming loose due to vibrations.

This is the end result, now only time can tell if it works or not. Will try this out tonight along with the 8 inch propellers.

Monday 22 July 2013

What does it weigh?


It's always essential to know what your model weighs. This model seem to weigh 1.3kg. My own estimations was 1.1kg given the weight info given for the parts used.

During test flights it have been able to sustain almost 16 minutes of flight time. That is using 1200kv motors with 9x4.7 propellers. I'm however intrigued to know what the data will be using the 8x4.7 propellers that are soon to arrive. I want to try the smaller propellers as I still feel that the motors are over performing given the model weight.

Sunday 21 July 2013

Malfunctioning motors

This is the video that I just recently submitted along with a support request to maybe get some new motors. You can see from the top left, to the bottom right motor 1, 2 and 3 not running properly.

Thursday 18 July 2013

Ultrasonic range finder part II: how it works

The now famous URF (ultrasonic range finder) has a bit more to tell than I wrote in my last post. One of my big questions was how it would interact with the on-board barometer. As any technical person would understand, is that at some point there will be some kind of conflict as these sensors will indicate different measures.

The URF is rather exact but only has a range of five meters. The barometer on the other hand has unlimited range but isn't that exact. In fact, its quite noisy and differ +/- 1-2 meters.

My experience is that the flight controller handles this in the way that, if the URF indicates different than last measurement then, it's the current height. Otherwise, the barometer is used. This way the URF is disregarded if it's too far from any object and the barometer takes over but also acts as an anti-collision sensor when coming in proximity to the ground.

What I'm still to experience is: What happens if the quad flies over trees? The barometer may indicate 20 meters, while the URF suddenly indicates 3 meters. What happens if it's programmed to hold at 20 meters? Does the quad bounce up 17 meters further? Interesting question.

Issues that I've experienced installing the sensor is that on my device, the Echo and Trigger labels are the wrong way around. On the flight controller that I'm using, the Multiwii MegaPirate board I'm supposed to connect echo to pin 9 and trigger to pin 10. That didn't work unless I connected them the other way around ;).

Wednesday 17 July 2013

It became self aware


Someone once said: -"Pictures or it didn't happen".

This is how to get prepared for flight. In addition to the quad and the transmitter, you need a laptop.


Everything is by this time wired. That's why you see the green light on the flight controller. It indicates that the GPS reports that it is locked on to a fixed position. The sonar is also connected and reports correctly.
 

Another picture..


So, you wanna see how it flies :) ? The video is rather short due to two factors.
  • The battery of my mobile was at this time drained to 4%, hence keeping it short.
  • The left down motor gets seriously overheated due to some fault. It may break down if its magnets gets loose. This could happen due to heat as they are glued on...
 Note that I show no hands as the quad loiters :)

Tuesday 16 July 2013

Spare parts has arrived!

A spare HobbyKing X550 frame, which I'm going to do some DIY'ing to use to add another level/layer of stuff to my current frame. You'll see how it works out soonish.

Battery for the Turnigy transmitter and a li-po low voltage alarm. I must have misplaced my other alarm I ordered a while ago because I can't find it. This alarm does both show the level of charge and also sound an alarm when the charge drops below 3.3V. My ESC's are currently programmed to cut-off at 3V to not harm the battery. This will hopefully prevent any fatal crashes that could happen if the motors are cut in mid-air. Luckily, this hasn't happened yet. The only times I've encountered cut-offs are just after takeoff which resulted in a one meter free fall.

Ultrasonic range finder and stuff

My trials with the ultrasonic range finder shows that it doesn't get too much interference from the other electronics that are located close by. I still made the rookie mistake by connecting the Echo and Trigger cable the wrong way around and spent much time trying to figure out what was wrong until I figured it out. I've also tried to activate AltHold while having the range finder activated. Didn't see much difference in it's behavior but it'll be essential for automatic landings.

Also, yet another motor has started showing signs of problem. It's slaming back and forth before spinning up but doesn't seem too big of an issue with that. However, after running for a while, 5-7 minutes, it gets really hot while the other three motors stay cool. I'm wondering why I'm having these problems with the motors all the time :(. Therefore I've made another order for more spare motors and I also threw in some more propellers. This time 8 inch x 4.5 propellers. Will try and see if these propellers are more suitable for the quads weight.

Thursday 11 July 2013

It's alive again!

I found some replacement screws for the one I lost in a local DIY store :). This afternoon I've also done some test flying to see that everything is OK and it seems so.

Regarding the package of replacement stuff and battery I ordered, it arrived in Sweden this morning but haven't got any updates from package trackers since 4.53 this AM. Hopefully I'll get it tomorrow but my hopes aren't that high for that to happened. Tuesday would however be a more realistic time of arrival.

Next I'll do some more trimming on the AltHold and will also try the AutoLand function soonish :).

Stay tuned!

Tuesday 9 July 2013

Order for spare parts

I decided to order another frame as spare part to replace the lost screw and to have more parts in case, or when things break.

While ordering the spare frame, I also threw in a chargeable battery for the transmitter. The transmitter uses eight batteries and replacing that will be somewhat costly in the long run. The battery might need some modification to the connector to fit my transmitter but I don't think it'll be an issue.

Today I received the tracking number, and as I ordered from the Germany warehouse, I hope the shipment will arrive soon.

Sunday 7 July 2013

One motor down..


Yesterday, I started trimming the AltHold function that relies on any altitude sensors. The sensor I have so far been using is the barometer, which is very noisy. That means it's less then perfect at holding it's altitude, but works +/- 1-2 meters.

Today, I thought of doing some more testing, maybe even try the AutoLand function as the AltHold seemed to work. However, after a few minutes of flying this happened..
One of the motors came off upon takeoff and took a piece of the radio antenna with it. The motors are fastened with two screws at the bottom and it seems as it came unscrewed, possibly due to vibrations. This seem to be the case for one other of the motors when I checked them all. It seems as checking the screws before going flying is a bullet on the pre-flight checklist.

Now, I only found one of the screws, which means, I have to get another somehow. Not sure if I should order a whole new frame as spare part or if I should try to find one in a local utility store. I'm going to try the second option tomorrow to see if they have any thing available that would work as a substitute.

Yes, there will be more videos. I have two that I filmed yesterday when doing some trimming but I haven't uploaded them to YouTube yet as my bandwidth is limited and the amount is not unlimited at the moment.

Thursday 4 July 2013

Update on the lost signal alarm

In short, don't use the throttle servo as I did. Apparently it doesn't move enough during flight so the alarm behaves as if the signal is lost from time to time. I'm now using something else, channel 4, whatever that is, but it works fine. Channel 3 is throttle.

Sensors, sensors

This is how I've mounted the ultrasonic range finder. It needs to be mounted some distance away from other electronics to avoid interference. I still don't know if this will work but it's a first try. Otherwise I'll have to find another solution. The range finder has a maximum range of five meters and should be pretty exact. I still have no clue how the flight controller will treat it's information in conjunction with it's on-board barometer. That's for the future to tell.

The other sensor, or should I say alarm, is a lost signal alarm. It reacts by emitting beeps after one minute of no change to the servo I've attached it to. It's currently attached to the throttle and so, if I don't change the throttle for one minute, it'll start beeping. I'd say the theory is that if you don't move the stick for more then a minute, your signal should probably be lost. Anyhow, then after another minute, it'll sound a more than 85dB beep until it's regained signal. In theory you should then be able to find your model if it's crashed somewhere out of sight. Cheap insurance policy.

Wednesday 3 July 2013

It has taken to the skies

[spot the shadow from the quad down to the right]
 
After painstakingly tuning P, I and D parameters in Mission Planner, it can now fly. This is a configuration part that I wasn't aware of until a few days ago, when I didn't understand why it was way too wobbly and always crashed. The reason was that my PID parameters was offside given the model, motor and propeller size I have. After some tuning using this guide, I was able to get it stable. There is still far to go when it comes to more autonomous flight but.. it flies!

Link to PID tuning guide.